These were posted to Ajaxian and had some useful tidbits:
3 part series on Mastering AJAX:
http://www-128.ibm.com/developerworks/web/library/wa-ajaxintro1.html
http://www-128.ibm.com/developerworks/web/library/wa-ajaxintro2/
http://www-128.ibm.com/developerworks/java/library/wa-ajaxintro3/index.html
2 part series on using SOAP with AJAX
http://www-128.ibm.com/developerworks/webservices/library/ws-wsajax/
http://www-128.ibm.com/developerworks/webservices/library/ws-wsajax2/
See the round-up of 30 AJAX tutorials for more useful information.
I'm also in the process of reading Ajax in Action which is very well written.
Friday, February 24, 2006
Mastering Ajax
Monday, January 30, 2006
Enabling JSP in Tomcat
Sometimes you just want to enable a directory on your tomcat server to be able to run JSP pages without actually installing a WAR or EAR file. Here are the essential steps to enable a directory to execute JSP files.
For this example, I'm setting it up on a SuSE Linux system so your directory structure may vary.
- Create a JSP directory in your tomcat webapps directory. In this case, the default webapps directory for Tomcat is
/srv/www/tomcat5/base/webapps/so I make ajspdirectory there. - Under the
jspdirectory I create the basic webapp directory structure and create a directory named/srv/www/tomcat5/base/webapps/jsp/WEB-INF - In the
WEB-INFdirectory, I create a basic deployment descriptor namedweb.xmlwhich looks like:
<?xml version="1.0" encoding="ISO-8859-1"?>
PUBLIC "-//Sun Microsystems, Inc.//DTD Web Application 2.3//EN"
"http://java.sun.com/j2ee/dtds/web-app_2_3.dtd">
<web-app>
   <display-name>My JSPs<display-name>
</web-app> - In the tomcat configuration directory
/etc/tomcat5/base/Catalina/localhostadd the context path for the JSPs in a file namedjsp.xmlthat looks like:
<Context path="/jsp" docBase="jsp"
debug="0" reloadable="true" /> - Restart Tomcat (
rctomcat5 restart) - Create some sample JSP file in the jsp directory (
/srv/www/tomcat5/base/webapps/jspsuch as:
<html>
<head>
<title>Hello World</title>
</head>
<body>
<h1><%= "Hello World" %><h1>
</body>
</html> - Make sure it's working via
http://localhost:8080/jsp/index.jsp - I run Tomcat under Apache via mod_jk so that I can utilize the SSL layer of Apache. So, to make the JSP transparently accessible from Apache, I update the
/etc/apache2/conf.d/jk.confand add the following lines:
    # Add the jsp directory
    Alias /jsp "/srv/www/tomcat5/base/webapps/jsp"
    <Directory "/srv/www/tomcat5/base/webapps/jsp">
        Options Indexes FollowSymLinks
        allow from all
    </Directory>
    JkMount /jsp ajp13
    JkMount /jsp/* ajp13
    <Location "/jsp/WEB-INF/">
        AllowOverride None
        deny from all
</Location> - After restarting Apache (
rcapache2 restart) I can then reference the JSPs directly from Apache, such ashttp://localhost/jsp/index.jsp
Multimedia setup for SuSE 10
This was a very useful resource for setting up multimedia capabilities for SuSE 10:
http://www.thejemreport.com/mambo/content/view/178/42/
Additionally, adding some of the extra Yast software sources from http://www.suseforums.net/index.php?showtopic=18575 or http://www.opensuse.org/Additional_YaST_Package_Repositories#External_YaST_Repositories is useful.
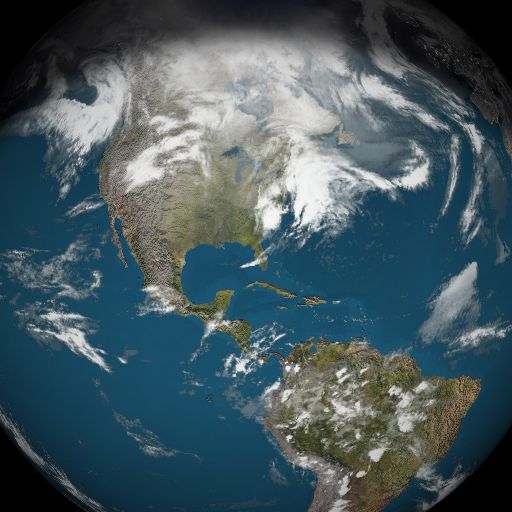
Current Earth image wallpaper
When I'm using Windows, I use WeatherPulse to display the current satelite picture on my desktop (the "GOES E on Color" option). I'm very happy with it and wanted something similar on my SuSE Linux KDE desktop. To do that, I used XPlanet. Below are the setup steps I followed:
- Install xplanet RPM if not already installed.
- I made a
.xplanetdirectory in my home directory in which I copied the config file from/usr/share/xplanet/config - In the
[earth]section of the config file, I added the lines:
map=/home/username/.xplanet/earthmap4k.png
bump_map=/home/username/.xplanet/earthbump4k.png
bump_scale=5
cloud_map=/home/pothoven/.xplanet/clouds.jpg - To get the dynamic cloud map, I downloaded the
download_clouds.plPerl script from http://xplanet.sourceforge.net/clouds.php to my .xplanet directory. Note: you may wish to change this line in the script to suite your preferences:
my $MaxDownloadFrequencyHours = 1; - I then added this line to my crontab
0 * * * * cd /home/username/.xplanet; perl download_clouds.pl > /dev/null
to update the cloud information once an hour - To get the topography and enahanced coloring maps in my config, they can be purchased from J.H.T.'s Planetary Pixel Emporium (though a Google search for
earthmap4kmay reveal other sources). - If you want to track a satelite, such as the Hubble telescope or International Space Station (ISS), download the lastest tracking data with either:
wget -O science.tle http://www.celestrak.com/NORAD/elements/science.txt
for scientific satelites (Hubble) or:
wget -O stations.tle http://celestrak.com/NORAD/elements/stations.txt
for space stations (ISS). In the resulting science.tle file, you will see a section with the header "HST" (Hubble space telescope), place those lines in a file namedhubble.tlewhich will then look like:
HST
1 20580U 90037B   06008.34262361  .00000587  00000-0  33114-4  0       5098
2 20580  28.4688  11.8178 0003636 285.4875  74.5312  14.99943058661070
If you also want to track the IST, also add the "ISS (ZARYA)" lines from thestations.tlefile. These lines will look something like:
ISS (ZARYA)
1 25544U 98067A   06009.46434028  .00013978  00000-0  10043-3 0  1177
2 25544  51.6445 283.5661 0010748 133.7206 217.3373 15.73896465408147
Then, create a file namedhubblein your.xplanetdirectory that contains:
20580 "" image=hubble.png transparent={0,0,0} trail={orbit,-10,0,5} color=green
for tracking the Hubble and/or:
25544 "" image=iss.png transparent={0,0,0} trail={orbit,-10,0,5} color=green
for tracking the space station. Finally, add this line to the[earth]clause of the config:
satellite_file=/home/username/.xplanet/hubble - Finally, set it up in KDE. right click on the background.
- Select
Configure Desktop. - Click on
Backgroundin the left hand panel. - In the Background group box, I have
No pictureselected. - Click on
Advanced Options. - I have
Use the following program for drawing the backgroundchecked. - Select XPlanet in the list.
- Click on Modify.
- My
Commandentry is:
xplanet  --config /home/username/.xplanet/config
      --geometry %xx%y --num_times 1 --output %f.jpg
      --latitude 27.96 --longitude -82.48 --radius 60 &&
      mv %f.jpg %f
(the latitude and longitude is for where I live -- adjust to suit) - My
Preview cmdentry is the same as above. - I have my
Refresh timeset to 5 minutes if I'm tracking satellites, and 30 minutes if not. - Enjoy a dynamic updating picture of the earth such as:

Update - December 19, 2007
First off, I want to point out that XPlanet is an option for Windows as well. See XPlanet on Microsoft Windows. You can use the same Perl script to download the latest cloud cover image using ActivePerl. When you run XPlanet use the
-fork option to have it periodically update the background.Secondly, the instructions above were for KDE, but if you use Gnome, here are the instructions to get XPlanet to work with Gnome2.
Wednesday, January 25, 2006
Encoding email addresses
Here is a handy online tool I use to encode email addresses on my web
pages so that spammers won't find it via automated searches.
http://automaticlabs.com/enkoderform/
Subscribe to:
Posts (Atom)